Graphics Programs Reference
In-Depth Information
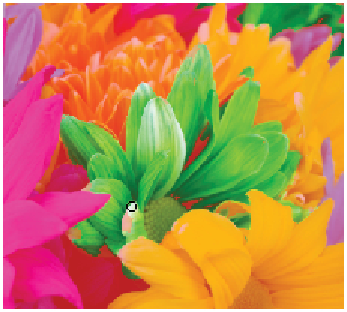
6
Carefully paint with the Brush tool over the masked areas in the green flower that you want to select.
If you accidently go too far, press Ctrl+Z (Windows) or Command+Z (Mac OS), or press
X
to swap
back to black to re-paint your mask. Continue working until there is no mask material on the green
flower.
Paint over the masked area on the green flower to remove the mask.
7
Press
Q
to toggle back to the Standard mode where you can see your selection. If you need to edit
more, press
Q
again to continue editing the mask with the Brush tool.
8
When you are finished, make sure you are back in the Standard mode by pressing Q, and then choose
Select > Save Selection. Name your selection
Green Flower
and click OK.
9
Choose File > Save to save your work file, and then choose File > Close.
Self study
Now that you have more experience with some of the selection tools, you can experiment on your own
with some additional images. Open the image named
advps03_Magic_Wand.psd
located in the ad-
vps03lessons and follow these steps:
1
Set your Magic Wand tool to the correct settings to select the shovel and the other two yellow toys in
this image.
2
Enter the Quick Mask mode to clean up the selections.
3
Save your selection.
You can also practice your refine selection skills by opening
advps03_Refine_Selection.psd
from the
advps03lessons folder. Using the Refine Edge feature you used in this lesson, refine the selection of this
model's hair.
Review
Questions
1
What are the consistent keyboard modifiers for adding and deleting to a selection?
2
How can you dynamically feather a mask in a manner that can easily be edited at a later time?