Graphics Programs Reference
In-Depth Information
8
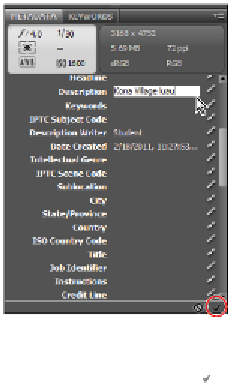
Scroll up to locate the Description text field. Click the Pencil icon to the right and type
Kona Village
luau
, to add a description for the image.
Reveal the IPTC contents and enter metadata information.
9
Click the Apply button ( ), located in the bottom-right corner of the Metadata panel, to apply your
changes. You have now edited metadata that is attached to the image; this information will appear
whenever someone opens your image in Bridge or views the image information in Adobe Photoshop
using File > File Info.
Using keywords
Keywords can reduce the time it takes to find an image on a computer by using logical words to help
users locate images more quickly.
1
With the same
IMG_4012.jpg
image still open, click the Keywords tab, which appears behind the
Metadata panel. A list of commonly used keywords appears.
2
Click the New Keyword button (+) at the bottom of the Keywords panel. Type
luau
into the active text
box, and then press Enter (Windows) or Return (Mac OS).
3
Select the check box to the left of the luau keyword. This adds the luau keyword to the selected image.
4
With the
luau
keyword still selected, click the New Sub Keyword button ( ). Type
family
into the
active text field, and then press Enter (Windows) or Return (Mac OS).
5
Select the check box to the left of the family keyword. You have now assigned a keyword and a sub-
keyword to the
IMG_4012.jpg
image.
6
Select the luau keyword, and then click the New Keyword button (+) at the bottom of the Keywords
panel; a blank text field appears. Type
faces
and press Enter (Windows) or Return (Mac OS). Then se-
lect the check box next to faces to assign the keyword to this image.
7
Right-click (Windows) or Ctrl+click (Mac OS) on the faces keyword, and choose the option Rename.
When the text box becomes highlighted, type
smiles
, press Enter (Windows) or Return (Mac OS).
Make sure the smiles check box remains selected.