Graphics Programs Reference
In-Depth Information
Replace Editing
- this is used to overwrite a shot into the Timeline, from the
Viewer, with the duration being determined by the shot which already exists in
the Timeline. By marking an 'in' point in both the Viewer and Timeline/Canvas,
the shot being edited will match the duration of the shot being replaced in the
Timeline. There is no need to mark an 'out' point.
Fit to Fill
- Four points need to be marked to achieve a Fit to Fill edit: an 'in'
and 'out' point in the Viewer and an 'in' and 'out' point in the Timeline or Canvas.
The shot in the Viewer will then be either sped up or slowed down to fit into
the space of the shot which is being overwritten in the Timeline. The overwritten
section of the Timeline will then need to be rendered (dealt with later).
Superimpose
- This is used for creating a second layer of video. When using
this type of edit a shot is edited from the Viewer to the second video track in
the Timeline. No apparent result will be noticed, other than that of an overwrite
edit, unless the edited shot is reduced in size, effectively creating a picture in
picture. If the opacity of the clip were to be adjusted then a superimposition
would be the result.
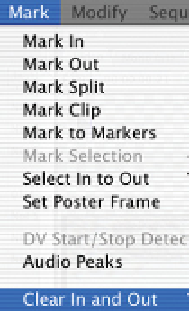
Modifying 'In' and 'Out' Points
If you wish to clear 'in' or 'out' points there are several
ways to achieve this.
■
1
Select the Mark menu at the top of the screen.
■
2
Scroll down and choose the relevant option: clear
'in' and 'out', clear 'in' or clear 'out'.
Keyboard shortcuts can be used to perform these
functions. Hold down the Alt/Option button (two keys to
the left of the Space Bar).
Alt/Option
x
Clear 'in' and 'out'
Alt/Option
i
Clear 'in'
Alt/Option
o
Clear 'out'
By holding down the Control key and clicking in the area
where one scrolls with the Scrubber Bar, in either the