Graphics Programs Reference
In-Depth Information
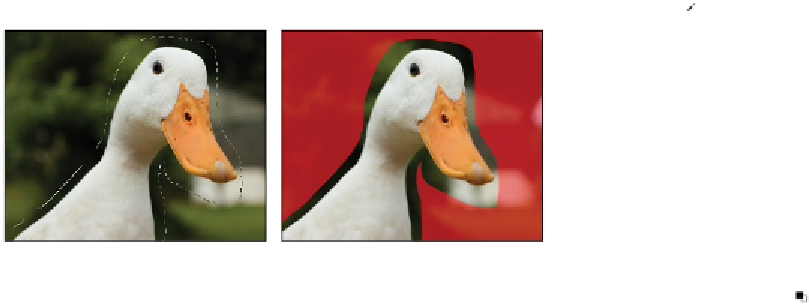
you are going to paint the rest of the selection using Photoshop's painting tools in the Quick Mask
mode.
4
Select the Quick Mask Mode button ( ) at the bottom of the Tools panel, or use the keyboard shortcut
Q
. Your image is now displayed with a red area (representing the mask) over areas of the image that are
not part of the selection.
5
Now you will use the painting tools to refine this selection. Select the Brush tool ( ) in the Tools panel.
Create a rough selection using the Lasso tool. The selection in the Quick Mask mode.
6
Click the Default Foreground and Background Colors button at the bottom of the Tools panel ( ), or
press
D
on your keyboard, to return to the default foreground and background colors of black and
white. Painting with black adds to the mask, essentially blocking that area of the image from any
changes. Painting with white subtracts from the mask, essentially making that area of the image active
and ready for changes.
As a default, the Quick Mask appears as red when you paint with black, and clear when you paint with
white. The red indicates a masked area.
These tips will help you to make more accurate corrections on the mask.
BRUSH FUNCTION BRUSH KEYBOARD SHORTCUTS
Make brush size larger ] (right bracket)
Make brush size smaller [ (left bracket)
Make brush harder Shift+] (right bracket)
Make brush softer Shift+[ (left bracket)
Return to default black and white colors D
Switch foreground and background colorsX
7
Choose View > 100% to view the image at 100 percent. Zoom in further if necessary.
8
With black as your foreground color, start painting close to the duck, where there might be some green
grass that you inadvertently included in the selection. Keep in mind that the areas where the red mask
appears will not be part of the selection.