Graphics Programs Reference
In-Depth Information
4
Position your cursor under the Sales text and click to create a new text entry. Exact position is not im-
portant, since you will reposition the text later. Type
Service
, then press Ctrl+Enter (Windows) or
Command+Return (Mac OS) to commit the text entry and exit the type options.
5
Position your cursor under the word Service and click and type
About
, then press Ctrl+Enter (Win-
dows) or Command+Return (Mac OS) to commit the text entry and exit the type options.
6
Position your cursor under the word About to make the last text entry, and click. Type the word
Contact
, then press Ctrl+Enter (Windows) or Command+Return (Mac OS) to commit the text entry
and exit the type options.
7
Choose File > Save, or press Ctrl+S (Windows) or Command+S (Mac OS) to save the file. Keep this
file open for the next part of this lesson. (If the Photoshop Format Options window appeared when you
saved, click OK.)
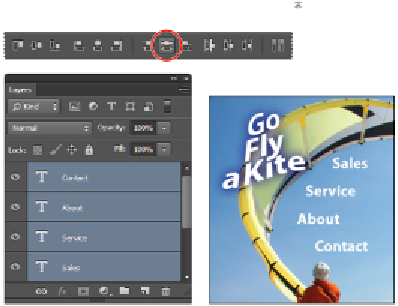
Positioning and distribution of text
In this part of the lesson, you will use the Move tool to reposition the text and then distribute the vertical
space between them evenly.
1
Select the Move tool ( ) and Ctrl+Click (Windows) or Command+Click (Mac OS) the word Sales (in
the image). By pressing and holding the Ctrl/Command key, you have turned on the auto-select feature.
You can easily activate layers without having to go to the Layers panel.
With the Sales layer selected, click and drag the text so it is off to the right of the curved edge of the
kite.
2
Press and hold the Ctrl/Command key, click the other three text layers, and position them off to the right
of the kite, following the curve of the kite image.
3
Make sure that the Layers panel is visible and select the Sales text layer. Then, Ctrl+Shift+click (Win-
dows) or Command+Shift+click (Mac OS) the Service, About, and Contact text layers (in the Layers
panel).
Note that when you select three or more layers, the Align and Distribute options become visible in the
Options bar. Align becomes visible with two layers selected.
4
Choose Distribute vertical centers ( ) from the Options bar. The text layers are distributed evenly.
Click the Distribute vertical centers button.
The selected layers now have equal amounts of vertical space between them.