Graphics Programs Reference
In-Depth Information
Adjust the curve in the Adjustments panel.
Click the Properties tab for the Curve adjustments to close it.
6
Choose File > Save, and then File > Close to close the file. Both butterflies in your work image are now
brighter. Multiple Smart Object layers can be linked to the same source file. When the source file is
changed in some way, all the linked files also change.
Replacing the contents of a Smart Object layer
Now that you have seen how multiple Smart Object layers are linked to the source file, you will change the
source file for the (now blue) butterfly. To understand the usefulness of this exercise, imagine that you
have duplicated several butterfly Smart Object layers and then rotated, resized, or warped them in different
ways. Now imagine that you have found a better source file for these layers. Instead of deleting the exist-
ing layers and repeating the steps, you can replace the existing butterfly image with a new one, and all the
transformations will stay the same.
1
In your
ps1201_work.psd
image, click Butterfly 5 in the Layers panel. Then select Edit > Free Trans-
form, or use the keyboard shortcut Ctrl+T (Windows) or Command+T (Mac OS), to transform the first
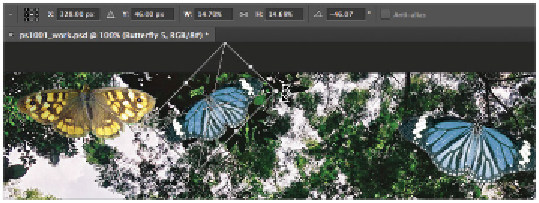
butterfly in the left corner. Hold the Shift key, click the top-left anchor point of the transform bounding
box, and drag downward and to the right, scaling the image down to approximately 15 percent.
2
Position your cursor slightly above and to the right of the top-right corner anchor point. A cursor with a
rounded arrow appears. Click and drag to the left to rotate the image approximately -45 degrees. Repos-
ition the image slightly to the right of the yellow butterfly. Press Enter (Windows) or Return (Mac OS)
to commit the transformation.
Both the scaling and rotating are tracked in the Options bar.
3
Select the Butterfly 4 layer in the Layers panel. Press Ctrl+T (Windows) or Command+T (Mac OS) to
transform the layer. You will now use Photoshop's Warp feature to simulate the butterfly moving
through the air.
4
Choose Edit > Transform > Warp. Feel free to create your own warping effect; for this effect, you would
click and drag the left wing upward and the right wing downward.