Graphics Programs Reference
In-Depth Information
Click from one point to another for straight paths.
5
When you reach the point you started at, press and hold the Alt key (Windows) or Option key (Mac OS)
to close the path. You will see a circle next to the cursor indicating that you are closing the path you
started. Pressing and holding the Alt/Option key is necessary because the first anchor point that you
created was clicked and dragged, making it a curved anchor point. If you just click that curved anchor
point without pressing and holding the Alt/Option key, it will react strangely and loop the last section of
your path.
Make sure to press and hold Alt/Option when clicking the closing anchor point.
6
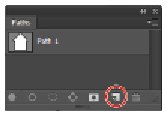
Choose Windows > Path to show the Paths panel and see your active path displayed in the panel. Click
the path and drag it down to the dog-eared Create new path icon ( ) at the bottom. You path is now
saved as Path 1. You can use the Path panel to save, activate, delete, and add new paths.
Drag your Work Path to the Create new path icon to save it.
7
Click in the blank area of the Paths panel and notice that the path is now deactivated. You do not see the
path line in your image area anymore. When you click Path 1 in the Paths panel, it returns. This is im-
portant to note because when you transform images with paths, you need to make sure to deactivate
paths first, or else you will scale the path instead of the layer.
8
Confirm that your path is still active by clicking Path 1.
9
Choose File > Save, and keep the file open for the next part of this lesson.
Turning into vector mask