Graphics Programs Reference
In-Depth Information
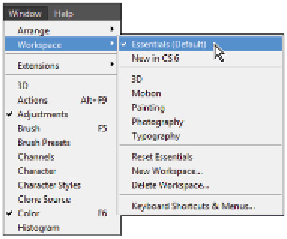
Putting the panel system to use
Photoshop has a default setting for all the panels: it's what you see when you initially launch Photoshop.
There are many panels, and not all of them are needed for all projects. This is the reason Photoshop has
defined workspaces, which can help you streamline your workflow. There are many prebuilt workspaces
available under the Window > Workspace menu; you can pick the one that helps you find the features you
need for the task at hand.
You can select different workspaces that help you find features depending upon the task at hand.
At this point, you have just reset the Essentials workspace. Test different workspaces by selecting Painting,
and then Photography from the Window > Workspace menu. Once you have seen how panels can be col-
lapsed and others made visible, return to Window > Workspace > Essentials.
Keep in mind that all these panels are accessible at all times from the Windows > Workspace menu.
To open panels that are not visible, choose the Window menu. If there is a check mark to the left of the
panel listed, it means that the panel is already open. Photoshop CC can determine whether a panel is hid-
den behind another; panels that are hidden this way will not be marked as open, so you can select it in the
Window menu to bring the hidden panel forward.
1
Select the Brush tool ( ).
2
Click the Swatches tab that is hidden behind the Color panel in the docking area to the right.
3
Click the color called Pure Red Orange in the Swatches panel. Notice that when you cross over a color,
a Tooltip appears. If it is easier for you to read the color, you can select Small List from the Swatches
panel menu ( ) in the upper-right corner.
Click the Swatches tab to bring it forward.
Choose to view the Swatches panel as a list.