Graphics Programs Reference
In-Depth Information
1
You should still have the
mylayers.psd
file open from the last exercise. If it is not, access the file in the
ps08lessons folder and select the red square layer in the Layers panel.
2
Make sure that the Move tool (
) is selected, then press and hold the Ctrl (Windows) or Command (Mac OS) key and select the yellow
circle in the image file. Notice that the yellow circle layer is automatically selected.
3
Now, press and hold the Ctrl (Windows) or Command (Mac OS) key and select the green square in the
image file. The green square layer is selected. By pressing and holding the Ctrl or Command key, you
turn on an auto-select feature that automatically selects the layer that contains the pixels you have
clicked on.
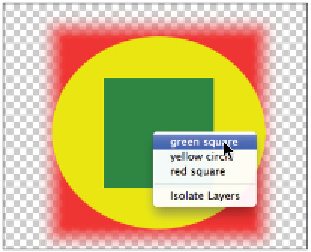
4
Make sure that the Move tool is still selected, and right-click (Windows) or Ctrl+click (Mac OS) on the
green square. Note that when you access the context tools, overlapping layers appear in a list, providing
you with the opportunity to select the layer in the menu that appears. Select the green square layer.
Select a layer using contextual tools.
5
Right-click (Windows) or Ctrl+click (Mac OS) on an area of the image file that contains only the red
square pixels to see that only one layer name appears for you to choose from. Choose red square.
Moving layers
Layers appear in the same stacking order in which they appear in the Layers panel. For instance, in the file
you have been working on in this lesson, the green square was created last and is at the top of the stacking
order, essentially covering up the yellow circle and red square wherever it is positioned.
By moving the position of a layer, you can change the way an image looks, which allows you to experi-
ment with different image compositions.