Graphics Programs Reference
In-Depth Information
4
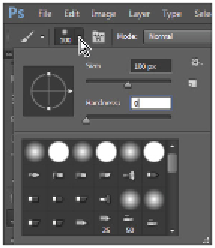
Click the Brush Preset Picker to see your options for size and hardness. There are several options that
you can change; for now you will focus on two.
5
Click and drag the size slider, which controls the size of the brush, to the right until you reach approx-
imately 100 px. If the Hardness slider, which controls the hardness or softness of the brush, is not all
the way to the left at 0%, slide it to the left now. This is now a large soft brush that will blend well at
the edges of the strokes
In the next step, you will paint and then undo it. This is to help you understand the concept of blending
and how it can make a difference when you paint.
Change the brush size and hardness.
6
Click and drag anywhere in the image one time to create a brush stroke across your image. Note that
you have created a large opaque streak.
7
Choose Edit > Undo Brush Tool, or use the keyboard shortcut Ctrl+Z (Windows) or Command+Z (Mac
OS) to undo the paint streak.
8
Now click and hold the Painting Mode drop-down menu; you see a list of options that allow you to
change how your paint interacts with the image underneath. Select Color from the bottom of the list.
9
Click the arrow to the right of the Opacity option to see the slider. Click and drag the Opacity slider to
the left until it reaches approximately 20%.
Select the paint blending mode named Color, and change the Opacity to 20%.
10
Now click and drag to paint in the upper-right corner of the image. You see that the result is quite dif-
ferent and you are brightening the sky.