Graphics Programs Reference
In-Depth Information
The Unsharp Mask filter assesses the brightness levels of adjacent pixels and increases their relative contrast: it light-
ens the light pixels that are located next to darker pixels as it darkens those darker pixels. You set the extent and range
of lightening and darkening that occurs using the sliders in the Unsharp Mask dialog box. When sharpening an image,
it's important to understand that the effects of the Unsharp Mask filter are far more pronounced on-screen than they
appear in high-resolution output, such as a printed piece.
In the Unsharp Mask dialog box, you have the following options:
Amount
determines how much the contrast of pixels is increased. Typically, an amount of 150 percent or more is ap-
plied, but this amount is reliant on the subject matter. Overdoing Unsharp Mask on a person's face can be rather
harsh, so that value can be set lower (150 percent) as compared to an image of a piece of equipment, where fine detail
is important (300 percent+).
Radius
determines the number of pixels surrounding the edge pixels that are affected by the sharpening. For high-res-
olution images, a radius between 1 and 2 is recommended. If you are creating oversized posters and billboards, you
might try experimenting with larger values.
Threshold
determines how different the brightness values between two pixels must be before they are considered
edge pixels and thus are sharpened by the filter. To avoid introducing unwanted noise into your image, a minimum
Threshold setting of 10 is recommended.
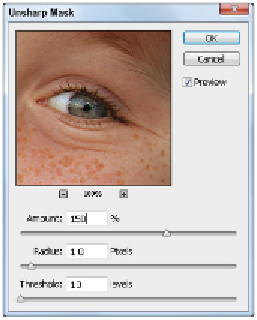
5
Type
150
into the Amount text box. Because this is an image of a child, you can apply a higher amount
of sharpening without bringing out unflattering detail.
Click and hold the Preview pane to turn the preview off and on as you make changes.
6
Type
1
in the Radius text field and
10
in the Threshold text field, and click OK.
Using the Unsharp Mask dialog box.
7
Choose File > Save. Keep the file open for the next part of this lesson.
Because you used the Smart Filter feature, you can turn the visibility of the filter off and on at any
time by clicking the visibility icon to the left of Smart Filters in the Layers panel. You will find out