HTML and CSS Reference
In-Depth Information
segment2.x = 100;
segment2.y = 120;
segment2.draw(context);
};
</script>
</body>
</html>
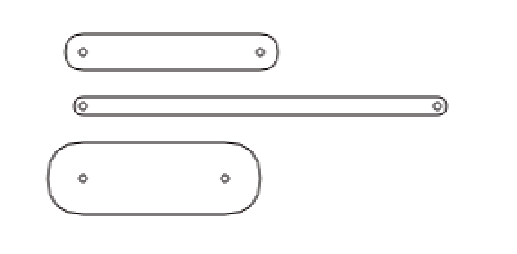
Figure 13-1.
Some sample segments
Something to notice in Figure 13-1 is that the segment width is the distance between the two pins, and the
actual width of the segment goes beyond that in both directions. You can see that each segment is placed
at an x position of 100. Although their left edges do not line up, all of the pins on the left do. When you
rotate the segment, it rotates around the left-hand pin.
The
Segment
class also contains the method
getPin
, which returns an object representing a point. This
contains
x
and
y
properties that are the position of the right-hand pin. Because the position changes as the
segment is rotated, we use some basic trigonometry to calculate it. This pin is where the next segment is
attached—which you see in the next section of this chapter.
For the next example, we created a single segment and put it on the canvas. We also added a new
Slider
class, which is used to adjust the segment's position. Although not necessary for understanding
kinematics, it's a convenient user interface element for changing numeric values on the fly. Remember,
you can download all the code from this topic at
www.apress.com
,
which you're free to use for whatever
you want. We don't spend much time explaining it because it's simple enough. You drag the lever with the
mouse to adjust the value. Don't confuse this class with the new HTML5 slider element for form input, this
interface element has been created entirely in JavaScript and drawn to the canvas. Here's the file that we
use in some of the remaining chapter examples (
slider.js
):
function Slider (min, max, value) {
this.min = (min === undefined) ? 0 : min;
this.max = (max === undefined) ? 100 : max;
this.value = (value === undefined) ? 100 : value;
this.onchange = null;
this.x = 0;
this.y = 0;
this.width = 16;
this.height = 100;
this.backColor = "#cccccc";