Graphics Programs Reference
In-Depth Information
3.
Select the Relative check box. This disre-
gards the numerical values of the current
canvas size and allows you to specify a new
amount to be added to the existing image.
4.
Ensure that the anchor point for the image is
set to centered. This will expand the border
in all directions around the center of the cur-
rent image.
5.
Add a half-inch border on all sides. Type .5
inches into the Width and Height fields.
6.
Specify a Canvas extension color. This is the
color that Photoshop places around the image
when you change the canvas size. You can
choose to use the foreground or background
colors that are loaded in the toolbox. You can
also use white, black, gray, or other, which
can be any color you specify. In this case,
choose white.
7.
Click OK.
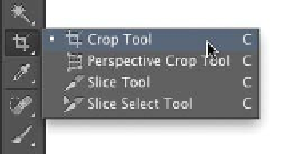
Crop Tool
With the Crop tool you can change a viewer's perception of an
image. You can choose to tighten the area of interest of an image,
which allows you to de-emphasize (or even eliminate) parts of a
photo and improve the image by better framing the subject.
You c a in i invoke c r op pi in g i in t wo w ay s . T The i r s t met ho d i nvolve s
making a selection with the Rectangular Marquee tool and then
choosing Image > Crop. Although this works fine, it does not offer
as much control as using the second method, the Crop tool. Let's
put method two into action:
Tip
Use Overlays
Photoshop CS6 offers six different
composition overlays when crop-
ping. You can press the O key after
you start a crop to cycle through
the different guides. These overlays
offer different theories for the
placement of key subjects within
a photo.
1.
Open the image Ch04_Crop.tif from the Chapter 4 folder.
2.
Select the Crop tool from the Tools panel or press C.
Handles for the Crop tool automatically appear at the edges
of the canvas. Let's crop to a specific ratio.