Graphics Programs Reference
In-Depth Information
4.
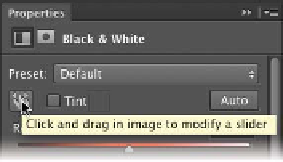
With the Black & White
command window open,
click the icon in the Adjust-
ments panel that looks like
a pointing finger.
5.
You c a n c l ic k on t he i m a g e
to sample a target. The
mouse pointer changes to
an eyedropper if you move
it over the image. Just click
and hold on an image area
to target the right color
slider for the strongest color
at that location. You can
then drag to shift the color
slider for that color, thus
making it lighter or darker.
6.
To c rea t e a duot one ef fect ,
select the Tint option. To
change the tint color, click
its swatch and use the Color
Picker to choose a new color
that matches your needs.
Tip
Blended Black and White
Be sure to try out blending modes
with your adjustment layers. The
Black & White adjustments look
great blended. Try Multiply or Over-
lay for this exercise.
video 68:
Creative Sepia Tones
Gradient Map
You c a n u s e t he G r a d ie nt M a p t o d r a m a t ic a l ly or s u bt ly s t yl i z e
images. The effect works best when used as an adjustment layer.
The command works by mapping the colors of a gradient to the
image based on the luminance values of the source image. Let's
give the technique a try.
1.
Close any open files, and then open the image Ch10_
Gradient_Map1.tif from the Chapter 10 folder.
2.
Click the Gradient Map icon in the Adjustments panel.