Image Processing Reference
In-Depth Information
Note:
I'll cover the Curves control included with the Photoshop CS2 version of Camera Raw in
Chapter 6,“Advanced Conversion Topics.” For more detailed information on Curves and Levels, I recom-
mend
Photoshop CS2 Workflow
by Tim Grey (Sybex, 2005) or
Photoshop for Nature Photographers
by Ellen
Anon and Tim Grey (Sybex, 2005).
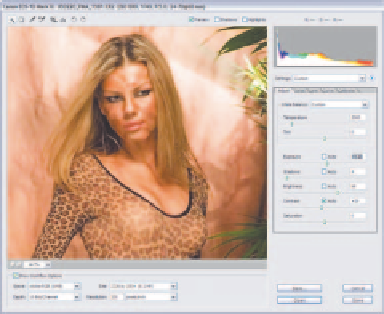
To increase the contrast in a RAW file, adjust the Contrast slider to the right.
Moving the slider to the left decreases contrast in the image giving it a flatter look. In
Figure 3.26, The Automatic setting of +19 was too strong for this image and produced
harsh shadows on the model's face, so I adjusted the Contrast slider to +3.
67
Figure 3.26
(left) The default setting for Contrast on this image was too high and made the midtones appear too harsh on the
model's face. (right) Lowering the Contrast setting in Camera Raw corrected the problem.
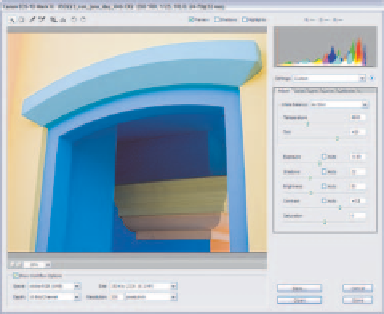
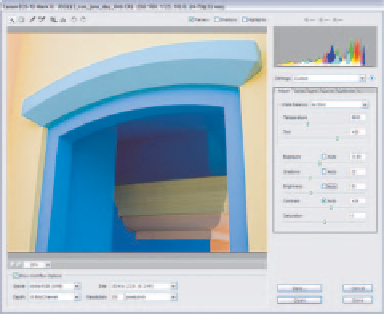
In contrast (no pun intended) to the previous image, the example shown in Fig-
ure 3.27 needed an increase in contrast. The original was a bit flat and had no real def-
inition from shadow to midtone. By increasing the Contrast slider to 52, you give the
image a more dramatic look.
Figure 3.27
(left) The default setting for Contrast on this image was too low and the entire image looks rather flat. (right) Raising
the Contrast setting in Camera Raw corrected the problem.


Search WWH ::

Custom Search