Image Processing Reference
In-Depth Information
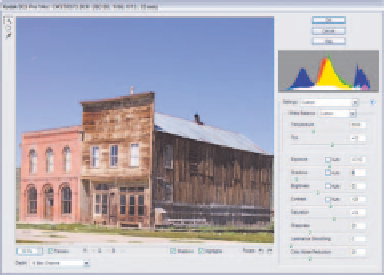
In contrast to the New York photo, the image from Bodie, CA (a ghost town in
the Sierra Nevada mountains) shown in Figure 2.22, is an example of when the Auto
settings are too aggressive. With the Highlights and Shadows checkboxes enabled, it's
clear that the Auto settings added too much exposure and shadow to the image, result-
ing in lost data. Making these adjustments manually, I was able to retain significant
detail that would have been lost at both ends of the tonal range if I had converted with
the Auto settings.
Unless you save custom defaults for Camera Raw settings, turning off Auto will
use the in-camera settings that were in effect when the image was captured.
40
Figure 2.22
(left) This image is going to lose significant amounts of shadow and highlight detail if the Auto settings are used.
(right) By setting these controls manually, I am able to retain detail what would have been otherwise lost.
Note:
Yo u can't hurt the image at this point by playing with the adjustment settings. Try the Auto
settings on your image to see if they work. You might need only a slight adjustment.
Exposure
The Exposure slider allows you to make adjustments of up to four stops over or under
to your RAW image. Using the Exposure slider is similar to setting exposure compensa-
tion in the camera when you capture an image. Unlike compensation set in camera
though, modifying the exposure in Camera Raw will not recover information that is
not there. In other words, if you've over or under exposed the image to the point where
no information other than black or white is recorded, the Exposure slider isn't going to
magically create that data for you. Adjustments to the Exposure slider can help make
shadow areas less dense and highlights less bright, which will allow subtle detail that
was
hiding in those areas to be more obvious.
The Auto setting for Exposure works very similarly to the Auto Levels command
in Photoshop and Photoshop Elements. It works by analyzing the image data and mak-
ing adjustments to maximize the amount of tonal range in your image.
Note:
Maximizing the tonal range is normally a good thing, but it is not appropriate for all images.
High key images, for example, would have the majority of their tonal range at the highlight side of the his-
togram. Spreading the tonal range out across the entire possible range would take away from the effect.


Search WWH ::

Custom Search