Image Processing Reference
In-Depth Information
2.
Select the RAW files you want to convert by Shift+clicking for contiguous files
or Ctrl+clicking for noncontiguous files.
3.
From the File Browser menu bar on Windows, choose File
>
Process Multiple
Files. On the Macintosh, choose Automate
>
Process Multiple Files. You'll see
the dialog box shown in Figure 5.9.
94
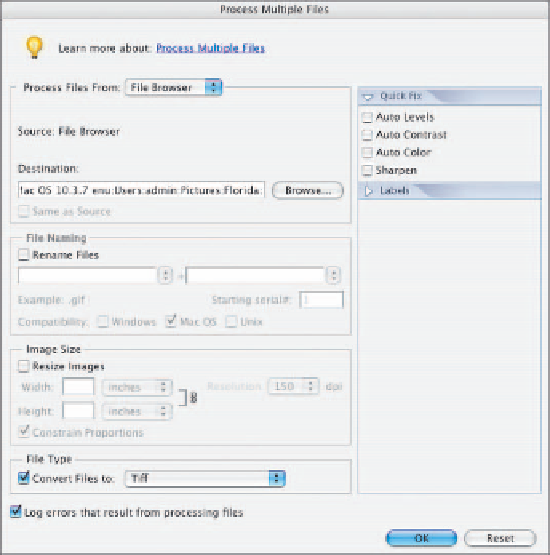
Figure 5.9
The quickest way for Photoshop Elements users to do batch conversions is to use
Process Multiple Files in the File Browser.
For this example, I've already selected the images I want to convert so Process Files
From will be left at File Browser. If I wanted to convert an entire folder of RAW files, I'd
select Folder. The Import option isn't valid for RAW images, and the Opened Files option
implies that you've already converted the images and have them open in Elements.
Destination lets you navigate to the folder you want to use to save the converted
images. If you're converting with the Folder option, you can also specify whether to
save to a new folder or save to the same folder by checking Same As Source.
File Naming has the same options as the Batch Rename dialog. Refer back to
Chapter 1, “Preliminary Workflow,” for details on naming options and suggestions.
Image Size gives you the option of resizing your image as part of the conversion
process. Unless you have a specific use intended for the converted file, I don't recom-
mend resizing during the conversion. The exception to this is when converting directly
from RAW to JPEG for web use. I occasionally convert RAW files for multiple uses by
running Process Multiple Files once to save them as 16-bit TIFF files and a second time
to create small JPEGs that will be used for a contact sheet. For the second pass, I select
Resize Images and set a Width of 320 and leave Constrain Proportions checked.

Search WWH ::

Custom Search