HTML and CSS Reference
In-Depth Information
In this case, assume that Gerry has already determined the coordinates for the hot-
spots in his image map and provided them for you. He wants you to create three hot-
spots, which are shown earlier in Figure 2-30. The fi rst is a circular hotspot linked to the
home.htm fi le, centered at the point (92, 82) and with a radius of 80 pixels. The second
is a rectangular hotspot linked to the tips.htm fi le, with corners at (235, 120) and (310,
150). The third is also rectangular, linked to the glossary.htm fi le, with corners at (340,
120) and (510, 150). You do not have to create a polygonal hotspot.
You'll name the image map containing these hotspots
logomap
.
To create an image map:
◗
1.
Return to the
home.htm
file in your text editor.
◗
2.
Directly below the
<img>
tag for the CAMshots header image, insert the following
map
element:
<map name=”logomap”>
</map>
◗
3.
Within the
map
element, insert a circular hotspot that points to the home.htm file
using the following
area
element:
<area shape=”circle” coords=”82, 82, 80”
href=”home.htm” alt=”Home Page” />
◗
4.
Directly below the
<area>
tag for the circular hotspot, insert the following two
rectangular hotspots pointing to the tips.htm and glossary.htm files:
<area shape=”rect” coords=”235, 120, 310, 150”
href=”tips.htm” alt=”Tips” />
<area shape=”rect” coords=”340, 120, 510, 150”
href=”glossary.htm” alt=”Glossary” />
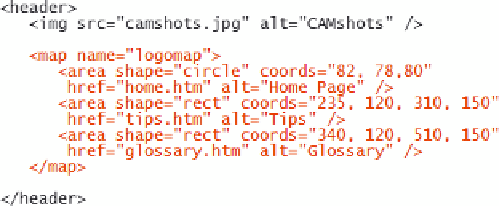
Figure 2-34 highlights the new code in the file.
Figure 2-34
Creating the logomap image map
circular and
rectangular
hotspots
◗
5.
Save your changes to the file.
With the image map defi ned, your next task is to apply that map to the CAMshots
header.
Applying an Image Map
To apply an image map to an image, you add the
usemap
attribute
<img src=”fi
fi le
” alt=”
text
” usemap=”#
map
” />
to the inline image, where
map
is the name assigned to the image map.


