Graphics Programs Reference
In-Depth Information
Step Five:
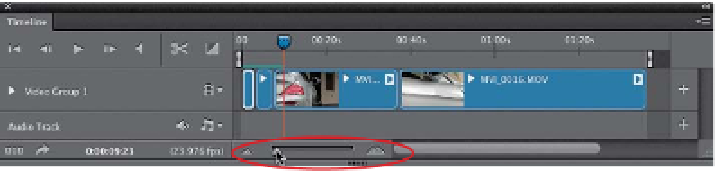
There are some other important things
you'll want to know about the Timeline
panel: One is that you can change the
size of the thumbnails in the Timeline
panel by dragging the size slider at the
bottom of the panel (it's shown circled
here in red). Dragging to the left makes
the thumbnails smaller; dragging to the
right makes them larger. The advantage
of choosing a smaller thumbnail size is
that you'll see more of your movie in the
timeline without scrolling (of course, it
helps if you have the eyes of a 14-year-
old, because if you're any older, you're
probably going to need bifocals).
If you zoom out, you can fit the whole 01:40 movie in the timeline without
having to scroll over to the right at all
If you zoom way in, now you're just seeing the first 7 seconds of your movie.
This is handy when you've got a lot going on (like a bunch of very short clips
close together with transitions)
TIP: Rearranging the Order of Clips
There are two ways to change the order
of how your clips play: (1) you can drag-
and-drop the clips into the order you
want right there in the timeline, or (2) you
can change the order over in the Layers
panel. They stack from bottom (being the
first clip to play) to top, so just drag-and-
drop the layers into the order you want
the clips to play.
Step Six:
If you want to see a quick preview of any
part of your video, you can just grab the
playhead and, as you drag it right or left
across your video, it plays a preview of
the video that's below it (you don't hear
any audio, you just see the video). This is
called “scrubbing” in “Video Land” (they
have a secret code name for everything).
This is a huge time saver and you'll find
yourself scrubbing over clips quite often.
Here, I'm “scrubbing” across the first clip to see a preview of it,
without clicking Play