Graphics Programs Reference
In-Depth Information
Okay, what do you do if you followed all these steps—you've hardware calibrated
your monitor, you've got the right paper profiles, and color profiles, and profiles
of profiles, and so on, and you've carefully turned on every checkbox, chosen all
the right color profiles, and you've done everything right—but the print still doesn't
match what you see onscreen? You know what we do? We fix it in Photoshop.
That's right—we make some simple tweaks that get the image looking right fast.
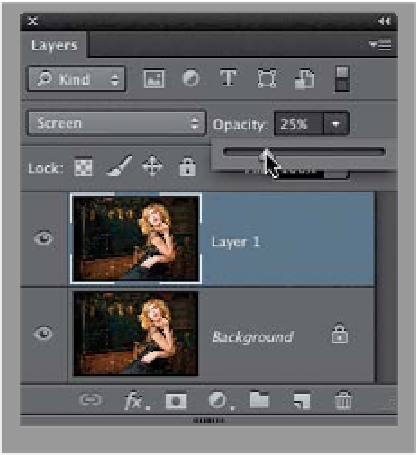
Your Print Is Too Dark
This is one of the most common prob-
lems, and it's mostly because today's
monitors are so much more incredibly
brighter (either that, or you're literally
viewing your images in a room that's too
dark). Luckily, this is an easy fix and here's
what I do: Press
Command-J (PC: Ctrl-J)
to duplicate the Background layer, then
at the top of the Layers panel, change
the layer blend mode to
Screen
to make
everything much brighter. Now, lower
the Opacity of this layer to 25% and (this
is key here) make a test print. Next, look
at the print, and see if it's a perfect match,
or if it's still too dark. If it's still too dark,
set the Opacity to 35% and make another
test print. It'll probably take a few test
prints to nail it, but once you do, your
problem is solved (by the way, this is a
great thing to make into an action).
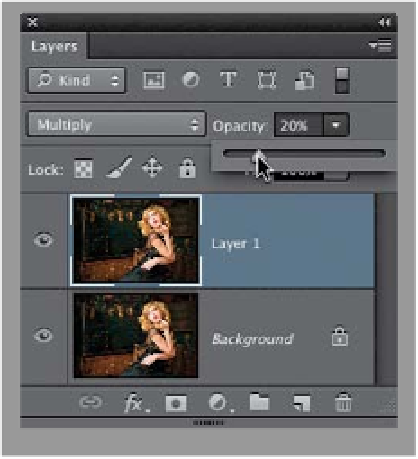
Your Print Is Too Light
This is less likely, but just as easy to fix.
Duplicate the Background layer, then
change the layer blend mode to
Multiply
to make everything darker. Now, lower
the Opacity of this layer to 20% and make
a test print. Again, you may have to make
a few test prints to get the right amount,
but once you've got it, you've got it. Now,
make that into an action (name it some-
thing like “Prep for Print”) and any time
you print, just run that action first.
(Continued)