Graphics Programs Reference
In-Depth Information
Step Five:
Now that you have this new merged layer,
you need to delete the middle layer (the
one you ran the Surface Blur upon), so
drag it onto the Trash icon at the bottom
of the Layers panel. Next, we have to deal
with all the funky neon colors on this layer,
and we do that by simply removing all the
color. Go under the Image menu, under
Adjustments, and choose
Desaturate
, so
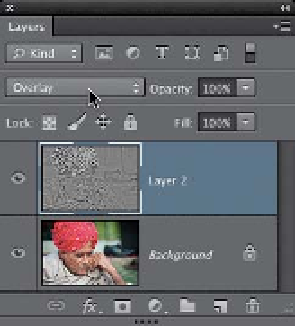
the layer only looks gray. Then, change
the blend mode of your merged layer
(Layer 2) to
Overlay
, and now you can
start to see the effect taking shape. You
can stop right there (I usually do), but
if you think you need an even stronger
high-contrast effect (hey, it's possible.
It just depends on the image, and how
much texture and contrast you want it
to have), you can continue on and crank
your amp up to 11 (sorry for the lame
This Is Spinal Tap
movie reference).
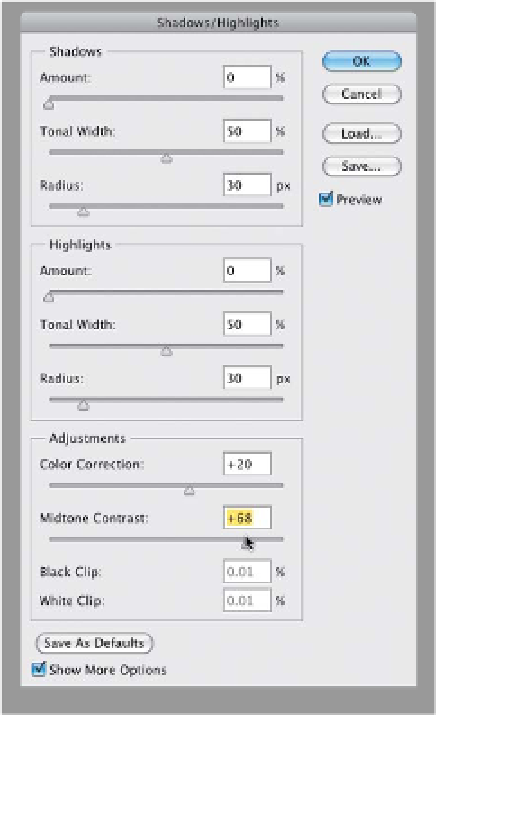
Step Six:
Go under the Image menu, under Adjust-
ments, and choose
Shadows/Highlights
.
In the dialog, drag the Shadows Amount
down to 0. Turn on the Show More Op-
tions checkbox to reveal more editing
options. Then, you're going to add what
amounts to Camera Raw's Clarity by in-
creasing the amount of Midtone Contrast
on this Overlay layer. Go down near the
bottom of the dialog and drag the Mid-
tone Contrast slider to the right, and
watch how your image starts to get that
crispy look (crispy, in a good way). Of
course, the farther to the right you drag,
the crispier it gets, so don't go too far,
because you're still going to sharpen
this image. Click OK. The next step
is optional, so if you don't need it, go
to the Layers panel's flyout menu and
choose
Flatten Image
. Don't forget to
stop your action here.