Graphics Programs Reference
In-Depth Information
Step Three:
Double-click on the thumbnail for this
duplicated smart object layer, and it
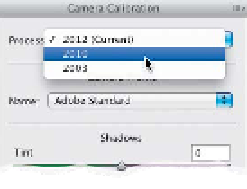
reopens in Camera Raw. Now, click on
the Camera Calibration icon (it's the
third one from the right and looks like
a camera) at the top of the Panel area
and, at the top of that panel, click on
the Process menu and choose
2010
(as shown here at the bottom). This
changes just this duplicate layer back
to the old process version, so it has
the controls from Photoshop CS5. Now,
go to the Basic panel and, lo and be-
hold, there is the old Fill Light slider.
Go ahead and crank that Fill Light slider
up (here, I dragged it over to 69). This
really opens up the shadows in her
hair (much more so than the Shadows
slider set to +100 in the current pro-
cess version). However, you can see the
weird look it gives the rest of the image,
which is why Adobe thought this con-
trol needed some improvements. When
it looks good to you, click OK.
Step Four:
With the top layer active in the Layers
panel, Option-click (PC: Alt-click) on the
Add Layer Mask icon at the bottom of the
panel to hide this newly processed layer
behind a black mask. Now, get the Brush
tool
(B)
, make sure your Foreground color
is set to white, then paint over the areas
you want to have the old Fill Light look (for
example, here I painted over her hair and
earrings, which is primarily what I wanted).
Here's the final image, using a combina-
tion of the old Camera Raw Fill Light slider
and the new, improved Camera Raw
processing power. Sweet!