Agriculture Reference
In-Depth Information
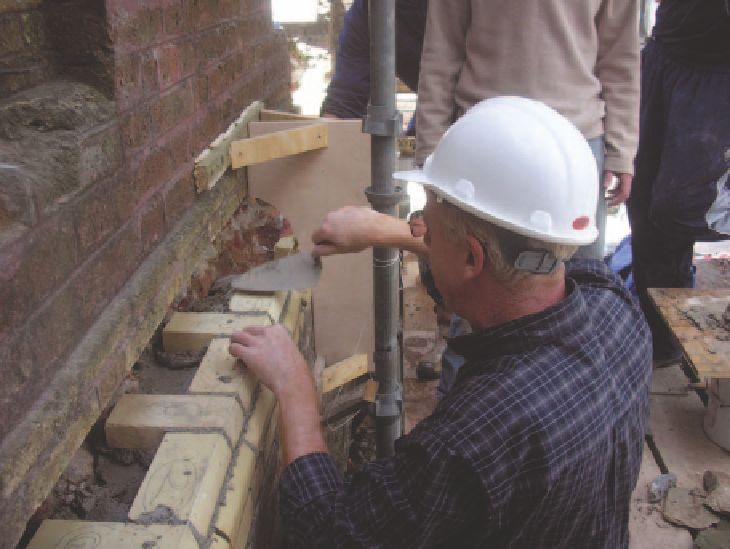
Figure 51
The author
demonstrating the
setting out and building
of the cut and rubbed
plinth detailing working
to lines strained from
a profile template.
(Courtesy of Ana
Dolan)
Here, once again, the skill and expertise of a master craftsman came to the
fore. Working alongside the craftsmen on the scaffolding, whilst they carefully
disassembled their sample and neatly stacked their bricks according to type
and position for their re-use, as he had directed, he quickly drew and then
made a timber 'reverse template' of the complete plinth enrichment with our
foreman, Willie Foley. This they carefully positioned and fixed to the wall,
checking it for line, level and gauge to the existing run of the plinth; and
ensuring all would meet precisely with the red face brickwork directly above.
He further demonstrated how to set out the gauge of each course onto it so
that it became a 'profile' for our craftsmen to strain lines further back along
the original plinth from which they were laying. Now with all this in place he
concentrated on the skills they required to lay the bricks so that the plinth
course matched the original in every respect (Fig. 51). He got them first to
'dry-bond' the element and mark out the bonding of each and every course so
it worked precisely to the original. The main structural emphasis, in order to
fully meet up with and fully support the main red brickwork suspended above,
was to tightly pack out behind each and every course of the facing bricks using
off cuts from the cutting and grout with fresh mortar. The topmost course of
cut-moulded plinths needed particular attention. It was vital to ram home, with
a suitably sized batten, the final bed of stiff mortar so that the external red fac-
ing bricks were properly seated on top of a full bed of mortar on the plinth
work and therefore fully bonded to the rest of the wall. The plinth brickwork