Graphics Programs Reference
In-Depth Information
3.26 The Knife Tool
As Blender is developing, some things seem to disappear from the interface. One such use-
ful tool is the
knife tool
. Th e knife tool is used to create additional vertices on the surface of
an object while in edit mode. It allows you to add vertices by drawing a line across a series
of edges much like subdividing, but limiting the subdivision to a specifi c region.
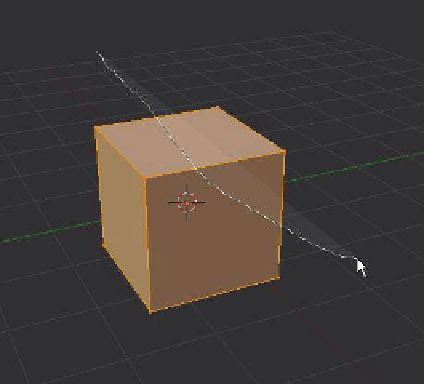
As an example using the default cube, tab into edit mode and leave all the vertices se-
lected (the vertices and edges should be orange). Hold down the K key and click and hold
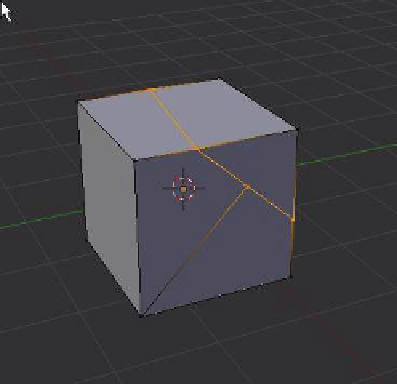
the LMB. Th e mouse cursor turns into a neat little knife (Figure 3.44). Drag the knife over
some of the edges on the cube. Release the mouse button and the vertices on the plane are
deselected except for new vertices, which have been created where your knife cut the edges.
Th e new vertices may now be manipulated to modify the surface of the cube object.
Learning
Unit 4
Knife Cut Tool
Figure 3.44
Drag the knife to cut the
edges of the cube.
New vertices are added
at the intersections.
3.26.1 Bezier Curves and Circles
Blender uses curves—or, to be precise—curve paths in a variety of ways. Objects can be
made to follow a curve path in an animation, they can be extruded following the shape of
a curve path, or they can be duplicated in a scene and placed along a path. Th e speed of an
object in an animation can be manipulated by altering the shape of a curve in a graph. Th ere
are many applications for curves and in particular Bezier curves. Th e Bezier circle is simply
a circular curve joined at the ends.
Curves are added to a scene by pressing Shift + the A key in object mode and selecting
“Add - Curves” (Figure 3.45). Bezier curves and circles are of particular importance since
they have control handles attached, which facilitate the reshaping of the curve. At fi rst, the
method of controlling the shape of the curve can be tricky to grasp especially without some
instruction. Run through the following tutorial to get the idea.
In the default Blender scene press the X key followed by “OK - Delete” to delete the cube
object. Change to the top orthographic view (number pad 7 followed by number pad 5).
Press Shift + the A key and select “Add - Curve - Bezier” to add a Bezier curve to the scene.
Learning
Unit 6
Bezier Curve and
Circle - Handles,
Bezier Curve and
Circle - Extrusion,
Bezier Curve
and Circle - Loft
Bevelling Along
a Path,
Bezier Curve and
Circle - Lathe
Bevelling Along
a Path