Graphics Programs Reference
In-Depth Information
E key then the Z key and drag the mouse to ex-
trude the circle up the
z
-axis. Press the S key and
scale the new circle of vertices out. Repeat this
process to shape the outside of the cup. When
you reach the rim of the cup, extrude and scale
circles of vertices in and down the
z
axis to form
the inner surface of the cup. At the bottom of the
interior with the final circle of vertices selected,
scale the circle in and zoom in on the view (num-
ber pad - key) as far as you can go. When you are
scaled all the way in, press “Remove Doubles” in
the tool panel to leave a single vertex at the center.
Tab back to object mode solid display and add a
subdivision surface modifier to make the surface of the cup nice and smooth.
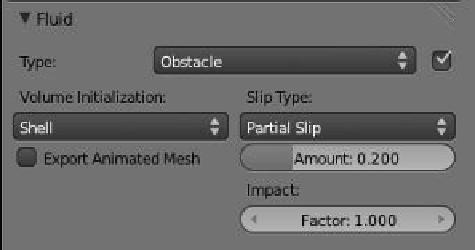
With the cup selected in the 3D window, go to the properties window - “Physics” button
- “Fluid” tab and select type “Obstacle” (Figure 17.6). Change the “Volume Initialization”
from “Volume” to “Shell”—with “Volume,” Blender considers the shape to be solid with no
interior. Now that all the objects required for the simulation have settings assigned, the fluid
simulation setup is now complete and ready to be baked.
Figure 17.6
17.2.4 Baking
In the 3D window in wireframe mode, select the domain cube. The “Domain” properties
tab will be displayed with the values that were previously set. Make note that baking a simu-
lation can take a long time depending on the complexity of the simulation, the resolution,
the length of the animation, and the speed of the computer. For the purpose of this scenario
in which the default values have been used, set the length of the animation to 50 frames in
the animation timeline window. At a display rate of 24 frames per second, this will produce
an animation lasting approximately 2 seconds.
Go back to the properties window - “Physics” button - “Fluid” tab. With the domain
object (the cube) selected in the 3D window, click on the “Bake” button. The
bake progress can be observed at the top of the 3D window in the fluid simula-
tion progress bar; the bar only appears when you bake and will be located in the
information window header adjacent to “Blender Render.” If you want to cancel
a bake, click on the × next to the bar. The bake takes a considerable time; it is
akin to creating an image for each frame of an animation, so be prepared to sit
back and wait a while. In this scenario, the bake should take about 30 seconds.
Note what happens in the 3D window. The domain has changed into a blob
that attaches itself to the sphere fluid object (Figure 17.7). When the bake is com-
pleted, change to solid mode and press Alt + the A key to view the animation of
the simulation. The blob descends, deforming as it goes, and splashes into the
cup. If the bake is not performing as expected, it can be terminated by pressing
the Esc key or the cancel button in the header and settings can be adjusted to
correct the action. To rebake the simulation, select the domain (which is now the
blob attached to the sphere) and press “Bake” again in the “Domain” properties
See Blender Wiki
PDF Manual,
p. 1062
Figure 17.7
Blob