Graphics Programs Reference
In-Depth Information
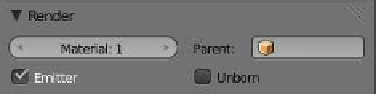
Figure 13.86
Click on the triangle to change the value.
Figure 13.87
block ID name, click on “Material.001,” and delete and rename it
“Skin” (Figure 13.85). Click on the + sign to add a new slot and
name the next one “Hair.” Repeat the process again and rename it
“Beard.” There are now three material slots, each with a separate
data block. Click on slot “Hair” and “Beard” in turn and choose
colors for them.
Go to the “Particles” button and at the top you will see “Par-
ticle System” and “Particle System 2.” Remember that the first
system is for the hair and the second is for the beard. Select
“Particle System” (hair) and in the “Render” tab - “Material”
button, click on the little triangle at the RHS until you get a
value of 2. Now do the same for “Particle System 2,” selecting a
value of 3 for the beard (Figure 13.86). The beard and hair look
strange, but at least the colors are pretty (Figure 13.87). As always there is much more to
play with in Blender; try the hair tutorials at
www.blendercookie.com
.
13.12.1 Final Note
Adding hair to an object can add an awful lot of vertices, which when rendering can take
an awful lot of time and may even cause your computer to stall out. If you are not doing
anything serious and have a slow machine to start with, keep the number of strands low.
13.13 The Assignment Tab
When a particle system is first added to a scene by clicking on the + sign, Blender introduc-
es a block of data to the scene that comprises a default particle system. Blender names this
data block “Particle Settings,” as seen in the “Settings” panel. The data block named “Particle
Settings” is automatically linked to the default particle system that is named “Particle Sys-
tem.” “Particle System” is placed in the assignment panel where it is assigned to an object in
the 3D window. This explanation may be viewed in Figure 13.88. There is no “Assignment”
tab or assignment panel as such, but for the purpose of this discussion we will consider the
area marked in green as the “Assignment” tab and the panel displaying “Particle System”
highlighted in blue as the assignment panel.
In the “Assignment” tab, there is a “Type” drop down menu that displays the options
“Emitter” and “Hair.” “Type: Emitter” is the default selection, which means that with the