Graphics Programs Reference
In-Depth Information
Note:
In Figure 13.23, I have taken the liberty of labeling the first part of the “Par-
ticles” button as the “Assignment” tab. This part of the window is always open un-
like the remainder of the tabs, which are opened and closed by clicking on the
triangles at the upper left-hand corner of each tab. The “Assignment” tab controls
what we do with a particle system when we have created a system (modified the
default system). We will therefore postpone the discussion of this tab until the very
end of this chapter.
13.4 The Particles Panel
The “Particles” panel displays all the options relating to how particles are generated and
displayed. To understand how to create specific effects using particles, we must first look at
some of the tabs.
Figure 13.24
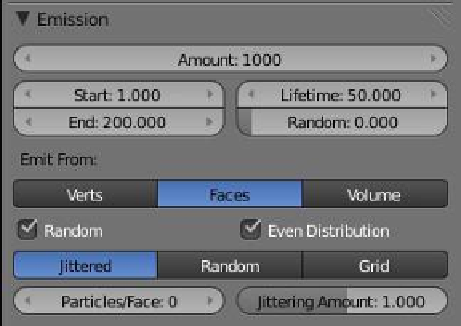
13.4.1 The Emission Tab
The “Emission” tab controls how particles are emit-
ted (Figure 13.24).
•
Amount.
The number of particles emit-
ted in the animation between the start
and the end frame settings.
•
Start.
The frame number in the ani-
mation where particles will start to be
emitted.
•
End.
The frame number in the anima-
tion where particle emission will stop.
•
Lifetime.
How long each particle will
be visible (number of frames) in the
animation.
•
Random.
Particles are emitted from faces in a random order.
•
Emit From.
Particles may be emitted from either vertices, faces, or the volume.
“Faces” is selected in Figure 13.24, as indicated by the blue highlight.
The remaining options in the tab control the order of particle generation.
•
Random, Even Distribution; Jittered, Random, Grid; Particles/Face, Jittering
Amount.
These options vary depending on which of the “Emit From” options
has been selected. Experimentation and recording of results are required to
establish combinations for specific applications.