Graphics Programs Reference
In-Depth Information
9.7 Modifying Curves
So far we have discussed creating graphical curves and
how to change or modify them, thus changing how
our actor behaves in the scene. Blender has more op-
tions for more subtle control of animation.
In the dope sheet, display all the channels and se-
lect them all. With your arrow cursor in the dope sheet,
press the A key until all the channels are highlighted in
white. Click on all the eyeballs until they are open. Now
press the N key to display a panel with a “View Proper-
ties” tab (Figure 9.16). This panel will only provide the
option to show or hide the cursor (the green horizontal
line). In the dope sheet, close all the eyeballs except for the
“X Location” channel. In the graphical editor, click the A
key twice to ensure all channels are selected; since only the
“X Location” eyeball is open, only that graph will display.
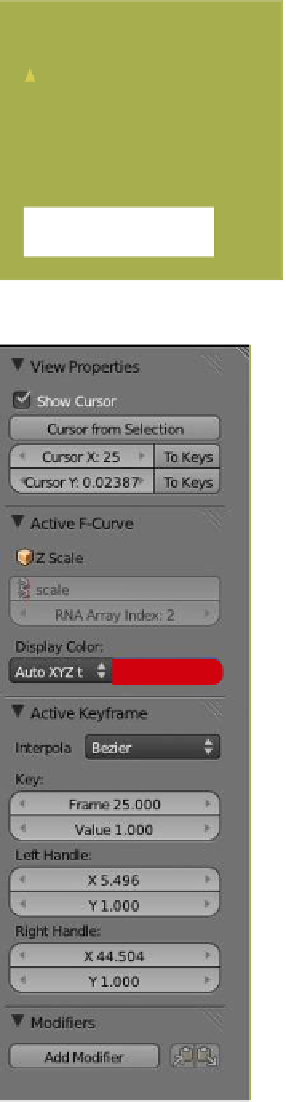
Click on the “X Location” channel in the dope sheet.
The new panel will now display four tabs: “View Prop-
erties,” “Active F-Curve,” “Active Keyframe,” and “Modi-
fiers” (Figure 9.17). The “Active F-Curve” tab shows
that the “X Location” curve is selected and that it is dis-
played in an “Auto XYZ to RGB” color. This color may
be changed by clicking on the drop down menu under
“Display Color.” It could be advantageous to change the
color of a curve if it is required to distinguish the curve
from another one.
At this point, we are interested in modifying our curve,
not changing its color. Note the “Modifiers” tab with its
“Add Modifier”
button. Clicking on this button produces
a drop down menu with eight options. We will not attempt
to demonstrate all of these options at this time, but sev-
eral are of particular interest. We have the “X Location”
channel curve selected in the graph editor panel. Now
click on “Add Modifier” and select “Cycles” (Figure 9.18).
The graph changes rather dramatically. The curve between
frame 25 and frame 75 is the same, but instead of straight
lines on either side, Blender has duplicated this curve. By
selecting “Cycles,” we have made the movement of the
curve cycle in 25-frame increments on either side of the
25-to-75 frame block.
We are starting to get into the complexity of Blender
and its multiple options. Look at the little “Cycles” panel
that has displayed under the “Add Modifier” button. Note
the “Before” and “After” options. Each of these have drop
Toggle the green line
on and off.
Figure 9.16
Figure 9.17