Information Technology Reference
In-Depth Information
3. Click Next.
The DVD or CD Sharing Installer shows you which folder it will use for the installation.
4. Click Install and then type your User Account Control credentials, if prompted.
The Installer sets up
DVD or CD Sharing on the Windows PC.
5. Click Finish.
6. Display the Control Panel window.
•
Windows 8.
Press Windows logo+X and then click Control Panel.
•
All other versions of Windows.
Choose Start →Control Panel.
7. Display all the Control Panel icons.
•
Windows 8 and Windows 7.
In the View By list, choose either Small icons or Large icons.
•
Windows Vista.
Click Classic View.
•
Windows XP.
Click Switch to Classic View.
8. Double-click the DVD or CD Sharing Options icon.
The DVD or CD Sharing dialog appears.
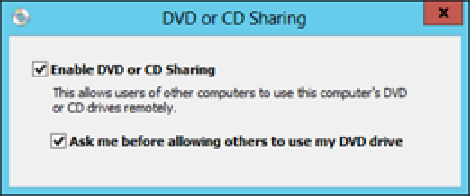
9. Select the Enable DVD or CD Sharing check box, as shown in Figure 12.13.
12.13
On the Windows PC, select the Enable DVD or CD Sharing check box.
10. If you want the operator of the Windows PC to be able to approve the remote use of the DVD
drive (this is always a good idea), leave the Ask me before allowing others to use my DVD drive check
box selected.
11. Click the X to close the dialog.
When you use a Mac as the Remote Disc host machine, pressing the Eject button on the host opens a dialog that
warns you the disc is being used by another computer, which is a great feature. Unfortunately, the Windows version of
DVD or CD Sharing doesn't come with this feature. This means that if the Windows user tries to eject the disc, no
warning appears, the disc ejects, and MacBook Air loses access to the disc.
You can now use Remote Disc on MacBook Air to access the DVD drive on the Windows PC. The technique is
the same as it is with a host Mac.