Graphics Programs Reference
In-Depth Information
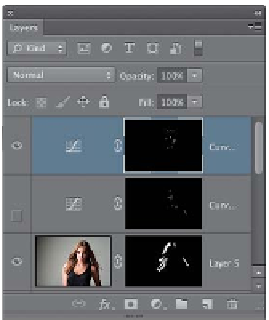
Step 11 :
Now, you're going to basically do
the same thing again by adding another
Curves adjustment layer from the Create
New Adjustment Layer icon's pop-up
menu, but this time you're going to drag
your curve in the opposite direction (down
to the bottom-right corner). You're still
going to invert the layer mask and paint
with your Foreground color set to white,
but when you paint, it paints in black (as
seen here, except for that one area that
painted red). This time you're going to
paint over the shadow areas (basically,
areas that recede), so go across the top
of her forehead, her cheekbones, right
under her bottom lip, and anywhere you
see a shadow area on her skin. Once that's
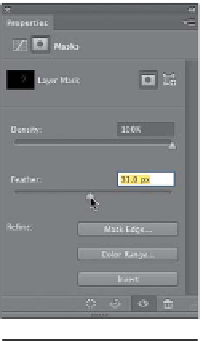
done, go back to the Properties panel,
click on the Masks icon, and raise the
Feather amount until those hard lines turn
into soft shadow areas (here, I raised the
Feather amount to 31 px).
Step 12:
At this point, these retouches kind of look
too intense, but that's because we're not
done yet. Make both of these adjustment
layers visible again (by clicking where the
Eye icon used to be next to the highlights
layer), and then you're going to lower the
Opacity of these of these Curves adjust-
ment layers until they look about right
(here, I lowered the highlights layer—the
first one we created—to around 50%, and
the shadows layer to around 60%). This is
supposed to be a somewhat subtle effect—
it's not supposed to be super-obvious—
so don't go overboard with it.