Graphics Programs Reference
In-Depth Information
One way to customize your slide show is to create your own custom opening and
closing title slides (I usually only create an opening slide). Besides just looking nice,
having an opening slide serves an important purpose—it conceals the first slide in your
presentation, so your client doesn't see the first image until the show actually begins.
Closing Title Slides
Step One:
You create opening /closing slides in the
Titles panel (found in the right side Panels
area). To turn this feature on, turn on the
Intro Screen checkbox and your title screen
appears for just a few seconds (as seen here),
then the first photo appears again. (Arrrgh!!!
It makes working with titles really frustrating,
however, here's a cool trick I stumbled upon
to make it stick around as long and when-
ever you want: just click-and-hold directly
on the Scale slider [as shown here] and it
assumes you're going to use it, so the title
screen stays visible until you let go.) The
little color swatch to the right lets you
choose a background color (by default, the
background color is black). To add text, you
add your Identity Plate text (or graphic) by
turning on the Add Identity Plate checkbox
(shown circled in red here), and your current
Identity Plate text appears (as seen here).
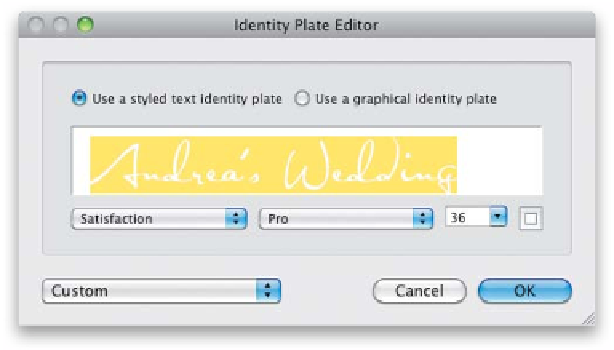
Step Two:
To customize your Identit y Plate text, click
on the little triangle in the bottom-right
corner of the Identity Plate preview and
choose
Edit
from the pop-up menu that
appears to bring up the Identity Plate Editor,
seen here. Now you can highlight the exist-
ing text, type in any text you'd like (in this
case, I added the bride's name), and choose
a different font from the Font pop-up menu
(I used “Satisfaction” from MyFonts [
www
.myfonts.com]
). Click OK to apply this text
to your intro slide.
Note:
If you make your
text white, it's impossible to see in this dia-
log, so I highlight it before I start typing and
then again when I'm done, as seen here.