Graphics Programs Reference
In-Depth Information
Step Three:
When Photoshop is done aligning and
blending your photos, a new document
will appear with your six images combined
into a single panoramic image (as seen
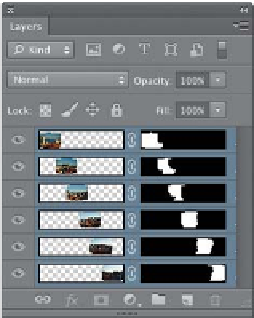
here). Parts of each photo wind up in this
document as a separate layer (as seen in
the Layers panel here), so if you wanted to
tweak the masks created by Photomerge,
you could (but we don't). Let's go ahead
and flatten the image by choosing
Flatten
Image
from the Layers panel's flyout menu
near the top-right corner of the panel.
Step Four:
Now that we've flattened the image,
we'll need to crop it down to size to get
rid of the areas that were adjusted to
make the image stitch together properly.
Sometimes this is pretty minor, other times
it's more pronounced, like this, but either
way, you're just a simple crop away from
having your pano look right. Get the Crop
tool (from the Toolbox, or just press
C
)
and click-and-drag the cropping borders
over the area you want to keep, as shown
here (I drag them as close to the edges
as I can, without having any white areas
show up on the edges after I crop). Once
your cropping border is in place, press the
Return (PC: Enter) key
to lock in your crop.