Graphics Programs Reference
In-Depth Information
Step Seven:
Now for the final tweaking of our selection:
Press-and-hold the Option (PC: Alt) key
and, in the Layers panel, click directly on the
layer mask thumbnail on the selection layer
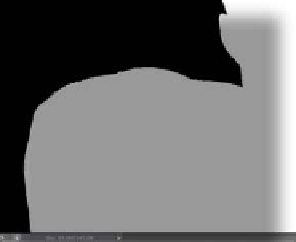
(shown circled here in red) to see just the
mask that's attached to our layer. Zoom in
tight on his hair, and see how there are areas
that are not solid white? How there are little
gaps where it kind of extends into his head
a bit? You don't want that. You only want
the tips of his hair at the edge, and the rest
has to be solid white (of course, you'll have
little transparent areas of his hair showing
through). So, get the Brush tool
(B)
, set your
Foreground color to white, get a hard-edged
brush from the Brush Picker up in the
Options Bar, then paint away those “falling
out” areas. Paint right up the base of his
hair (as shown here), but not actually onto
this hair. Also, take a look around the whole
selection for any areas that are not 100%
solid white (caused by the Smart Radius
slider). If they're not solid white, paint over
them to make them solid white.
Step Eight:
Option-click (PC: Alt-click) on the layer
mask thumbnail again to return to your
regular view, and your selection should be
ready to go. You can remove the mask at
this point by clicking directly on it in the
Layers panel and dragging it onto the Trash
icon at the bottom of the panel. This brings
up a dialog asking if you want to apply the
mask before deleting it permanently. Click
Apply (otherwise it deletes it and your
background comes back) and then open
the background image you want to place
your player onto. In this case, I'm using
a stock photo background from
http:
//photoar ttextures .com
(f (from their Street-
scapes collections. Their stuff is incredible
for compositing backgrounds. Highly rec-
ommended). So, now we have two images
open: your background file, and your player
isolated on a transparent background.