Graphics Programs Reference
In-Depth Information
Step Five:
The next section down, File Naming, is like
the file naming feature you learned about
back in the Importing chapter. If you don't
want to rename the files you're exporting,
but want to keep their current names,
leave the Rename To checkbox turned
off, or turn it on and choose Filename
from the pop-up menu. If you do want to
rename the files, choose one of the built-
in templates, or if you created a custom
file naming template (we learned this
back in Chapter 1), it will appear in this
list, too. In our example, I chose Custom
Name - Sequence (which automatically
adds a sequential number, starting at 1,
to the end of my custom name). Then, I
simply named these shots “LSR_Toronto,”
so the photos will wind up being named
LSR_Toronto-1, LSR_Toronto-2, and so on.
There's also a pop-up menu for choosing
whether the file extension appears in all
uppercase (.JPG) or lowercase (.jpg).
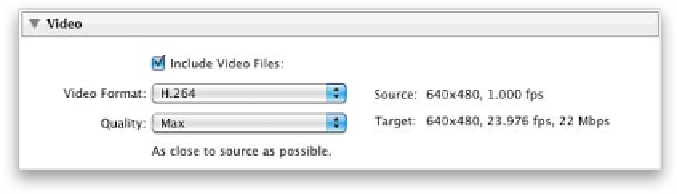
Step Six:
Let's say you're exporting an entire collec-
tion of images, and inside that collection
are some video clips that were shot with
your DSLR. If you want them included in
your export, in the Video section, turn on
the Include Video Files checkbox (shown
here). Below that checkbox, you'll choose
the video format (H.264 is really com-
pressed, and is for playing on a mobile de-
vice; DPX is usually for visual effects). Next,
choose your video Quality: Max will keep
the quality as close to your original video
as possible, and High is still good, but may
be slower. Choose Medium if you're going
to post it to the web, or if you're planning
to view it on a high-end tablet. Choose
Low for viewing on all other mobile devices.
You can see the dif ferences bet ween your
format and quality choices by watching the
Target size and speed listed to the right of
the Quality pop-up menu. Of course, if you
don't have any videos chosen when you
export, this section will be grayed out.