Graphics Programs Reference
In-Depth Information
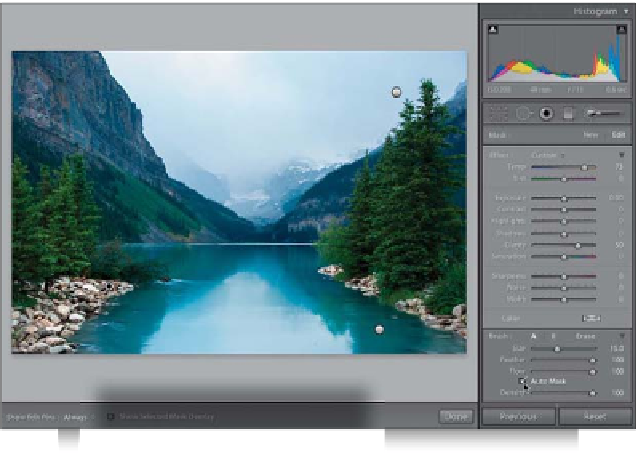
Step Seven:
Click the New button again, so we can
work on a different area without disturbing
the areas we've already worked on. Let's
add some clarity to the rocks, so choose
Clarity
from the Effect pop-up menu and
then start painting over the rocks (be sure
to paint over them on both sides of the
photo). This adds midtone contrast and
even makes them a bit brighter. Now, why
don't we warm those rocks up a bit by
dragging the Temp slider to the right (as
shown here), which adds a warm orangeish
tone to them.
TIP: Changing Brush Sizes
To change your brush size, you can use the
Left and Right Bracket keys
(they're to
the right of the letter P on your keyboard).
Pressing the Left Bracket key makes your
brush smaller; the Right Bracket key makes
it bigger.
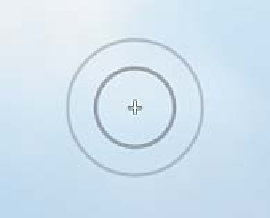
Step Eight:
If you're worried about adding Clarity and
warmth to the water, too, you really don't
have to worry about it that much thanks
to the Auto Mask feature (found near the
bottom of the panel). It kind of senses
where the edges of things are and it keeps
you from accidentally painting where you
don't want to paint. It's off by default, but
I usually turn it on and leave it that way
almost all the time (with one exception,
which we'll cover in a moment), because
it does a really amazing job. The trick to
it is knowing how it works: You see that
little + (plus sign) in the center of the brush
(shown in the overlay here)? That's what
determines what's getting painted, and any
area that + travels over gets painted, so as
long as that + doesn't go over the water,
it won't paint it—even if the round outer
rim of the brush extends way over onto
the water. Remember, if the + strays over
the water, it figures it's okay to paint over
it, so as long as you keep that off the
water, it leaves that area alone.
Continued