Graphics Programs Reference
In-Depth Information
3.
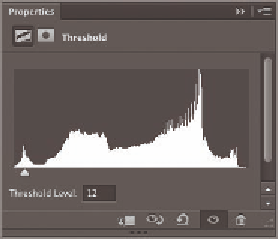
Choose Layer a New Adjustment Layer a Threshold to help you identify
the black, gray, and white points on the image. Click OK when prompted
to name the layer Threshold 1. Drag the slider in the Properties panel
all the way to the left and then slowly drag it to the right until you start
to see some black in the document window (see Figure 15.14). The first
places you see black are the darkest pixels in the image.
4.
Select the Color Sampler tool. Click one point inside the darkest part
of the image as indicated by the Threshold adjustment layer to place
marker #1.
FIGURe 15.14
Adjusting the
Threshold slider
5.
Drag the Threshold slider in the Properties panel all the way to the
right. Then back the slider off slightly to the left until you see some
white appear in the document window; this represents the brightest
part of the image. Click inside the white area to place color sampler
marker #2.
6.
Drag the Threshold slider to the left and observe which pixels change
color from black to white near the middle of the histogram. Click
once more in the document window (in this case in the lower-right
corner) to set marker #3. Figure 15.15 shows the location of the three
markers.
O
Look for a neutral
gray or white in the
image to set the
midpoint.
7.
Press Delete to get rid of the Threshold 1 layer because it is no longer
needed.