Database Reference
In-Depth Information
Note:
Sometimes Xcode will create relationship properties with the generic
NSManagedObject
type instead of the specific class, especially if you're making
lots of subclasses at the same time. If this happens, just correct the type
yourself or generate the specific file again.
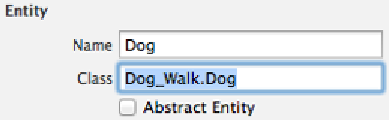
There is one more step before you can use your managed object subclasses. Click
into the data model, select the
Dog
entity and open the
Data Model
inspector:
Next to
Class
, replace
Dog
with
Dog_Walk.Dog
. Do the same for the
Walk
entity,
swapping
Walk
with
Dog_Walk.Walk
. You did this in the last chapter, but in case
you forgot why it's necessary, this step connects the fully specified class name for
your managed object subclasses with the entities in your data model.
A walk down persistence lane
All your setup is complete: your Core Data stack, your data model and your
managed object subclasses. It's time to convert Dog Walk to use Core Data. You've
done this several times before, so this should be an easy section for you.
Pretend for a moment that this application will at some point support tracking
multiple dogs. The first step is to track the currently selected dog. Switch to
ViewController.swift
and replace the
walks
array with the following property:
var
currentDog:
Dog
!
Then, add the following code to the end of
viewDidLoad
:
//Insert Dog entity
let
dogEntity =
NSEntityDescription
.
entityForName
(
"Dog"
,
inManagedObjectContext:
managedContext
)
let
dog =
Dog
(entity: dogEntity!,
insertIntoManagedObjectContext:
managedContext
)
let
dogName =
"Fido"
let
dogFetch =
NSFetchRequest
(entityName:
"Dog"
)
dogFetch.
predicate
=
NSPredicate
(format:
"name == %@"
, dogName)
var
error:
NSError
?