Database Reference
In-Depth Information
Mapping model
In the Xcode menu, choose
File\New File
and select the
iOS\Core
Data\Mapping Model
template. Select version 3 as the source model and version
4 as the target, and name the file
UnCloudNotesMappingModel_v3_to_v4.
Open the new mapping model in Xcode and you'll see that Xcode has again
helpfully filled in a few mappings for you.
Starting with the
NoteToNote
mapping, Xcode has directly copied the source
entities from the source store to the target with no conversion or transformation.
The default Xcode values for this simple data migration are good to go, as-is!
Select the
AttachmentToAttachment
mapping. Xcode has also detected some
common attributes in the source and target entities and generated mappings.
However, you want to
convert
Attachment entities to ImageAttachment entities.
What Xcode has created here will map Attachment to Attachment, which isn't
necessary. Delete this mapping.
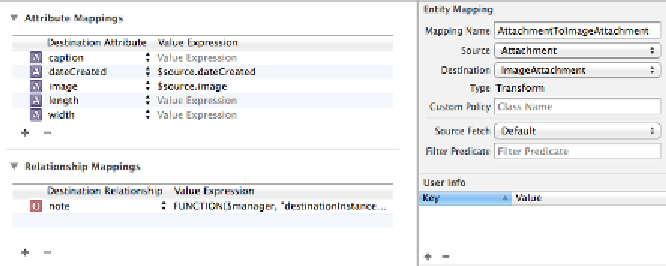
Now select the
ImageAttachment
mapping and rename it to
AttachmentToImageAttachment
to describe what it will do more accurately.
This mapping has no source entity since this is a completely new entity. In the
inspector, change the source entity to be
Attachment
. Now that it knows the
source, Xcode will fill in a few of the value expressions for you.
For the remaining attributes, you'll need to write some code. This is where you
need image processing and custom code beyond simple
FUNCTION
expressions!
Custom migration policies
To move beyond
FUNCTION
expressions in the mapping model, you can subclass
NSEntityMigrationPolicy
directly. This lets you write Swift code to handle the
migration, instance by instance, so you can call on any framework or library
available to the rest of your app.
Add a new Swift file to the project called
AttachmentToImageAttachmentMigrationPolicyV3toV4
and replace its
contents with the following starter code: