Database Reference
In-Depth Information
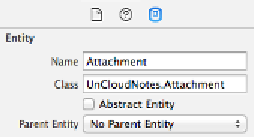
Create two attributes in the Attachment entity. Add an attribute named
image
of
type
Transformable
, with the value transformer set to
UnCloudNotes.ImageTransformer
. This is the same as the image attribute you
added to the Note entity earlier. Add a second attribute called
dateCreated
and
make it a
Date
type.
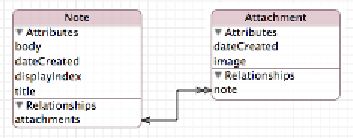
Next, add a relationship to the Attachment entity to relate it to its Note. Set the
relationship name to
note
and its destination to
Note
.
Select the
Note
entity and delete the
image
attribute. Finally, create a to-many
relationship from the
Note
entity to the
Attachment
entity. Name the relationship
attachments
, set the destination to
Attachment
and select the
note
relationship
you just created as the inverse.
The data model is now ready for migration!
Mapping models
With lightweight migrations, Core Data can automatically determine the steps to
take to move from one model version to another when the changes are simple.
When the changes aren't as simple, you can manually set up the steps to migrate
from one model version to another with a
mapping model
.
It's important that before creating a mapping model, you complete and finalize your
target model. You've finished the changes to the v3 data model, and you know that
lightweight migration isn't going to do the job. To create a mapping model, open
the
File
menu in Xcode and select
New\File
. Navigate to the
iOS\Core Data
section and select
Mapping Model
: