Graphics Programs Reference
In-Depth Information
The other button previews the selection as a mask, with the selected area displayed clear of
color and the non-selected area shown with a specific color overlay. The color and transpar-
ency of the mask overlay can be altered by double-clicking the preview button.
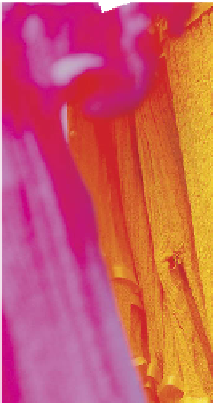
Switching between the stan-
dard and Mask views of an en-
larged image allows you to see
more accurately where the se-
lection is being applied.
S thi
bt
th
t
Standard preview
Mask preview
Mask preview showing
feathered edge
Selecting the Mask option provides a much better way of viewing the quality of the selec-
tion edge as it is possible to preview the sharpness of the edge as well as how transparent
the overlap is between selected and non-selected areas (feathering). For best results, use the
Mask option in conjunction with the Zoom and Move tools to inspect an enlarged preview of
the selection edge, as you make changes to the dialog's slider controls.
Press the 'P' key to turn off the preview of the current Refine Edge settings and the 'X' key to
temporarily display the Full Image view.
Refine Edge workflow:
1 When a selection is active, you can display the dialog by choosing Select > Refine
Edge.
2 By default a selection's edge is displayed as flashing series of dotted lines. These
'marching ants' ably show where the selection starts and end but are not able to
display the quality of the edge itself. Start by selecting the Preview option. Then,
to better see the effect of changes made in the dialog to selection edge, choose a
different preview option.
3 With the Preview sorted, you can now use the slider controls to alter the selec-
tion's edge qualities. Clicking the OK button will apply the changes.


Search WWH ::

Custom Search