Hardware Reference
In-Depth Information
3.
Go to the Run menu and choose Run Module (or press F5).
4.
Click OK when Python displays the message Source Must Be Saved.
5.
Enter a ilename and then click Save.
6.
You will see a message saying RESTART, and then Python should run your code. If an
error message appears, go back and correct your code and try running it again.
You've now written the hardware equivalent of Hello World - an LED that lashes. he next
examples will show how to make the Raspberry Pi respond to the world, as you will learn how
to read inputs.
As an extension, you could try lashing a more complex pattern - change the rate the LED
lashes at or try lashing multiple LEDs.
Reading a Switch
For a computer to respond to its environment, it needs to be able to read inputs. First you
will use the graphical emulator to display the status of the inputs.
Showing Input Status Graphically
In the emulator, click the Keep Inputs Updated check box as shown in Figure 9-3. he inter-
val sets how often the inputs are read; for most cases, it is ine to leave it on 500ms.
Figure 9-3:
Enable the Keep
Inputs Updated
check box to
show the status
of inputs.
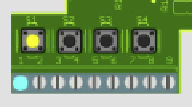
Test the input by pressing one of the buttons on the bottom left of PiFace. As shown in Figure
9-4, the on-screen representation changes to indicate the switch that has been pressed.
Figure 9-4:
he status of
inputs are
shown in the
emulator.
You can close the emulator for now by clicking the cross in the top-right corner of the window.