Graphics Programs Reference
In-Depth Information
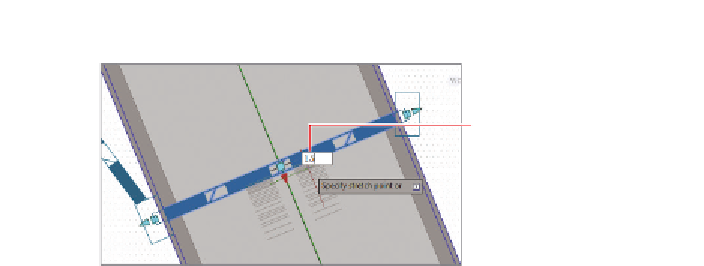
You can type
1.5 here
FiGuRE 14.11
Using Dynamic Input to
enter a pipe diameter value
8.
In the bottom-right viewport, zoom in to the manhole located near
the west corner of the Common Area. Click the manhole, and then
click the square grip at its center.
9.
If your Osnap icon is turned off, click it to turn it on.
▶
10.
Click the center of the red circle west of the manhole.
11.
Click in the top-right viewport, and then click the pipe in the Jordan
Court profile view that is farthest to the left.
If you watch carefully,
you'll see the posi-
tion of the manhole
change slightly in the
profile view.
12.
Click the bottom diamond-shaped grip on the left end of the pipe, and
then zoom out until you can see the dynamic input dimension and text
box. Type
180
(
54.864
) in the text box, and press Enter.
13.
Press Esc to clear any selections. Click the Dynamic Input icon to
turn off that feature, and then click the structure farthest to the left
in the Jordan Court profile view.
▶
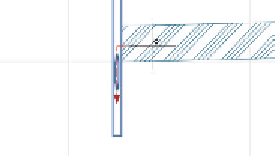
14.
Click the triangle grip at the bottom of the structure, and drag it
upward until a red dashed line appears (see Figure 14.12). Click while
this symbol is visible.
The sump elevation of
the structure is raised
slightly, but Civil 3D
won't allow the sump
to be placed above the
lowest connecting pipe.
15.
Save and close the drawing.
You can view the results of successfully completing this exercise by opening
Editing Pipe Networks Using Grips - Complete.dwg.
FiGuRE 14.12
Editing the sump elevation of a structure using grips