Graphics Programs Reference
In-Depth Information
This bearing now serves both lots. Notice that this is a NE bearing,
whereas those to the east are SW bearings.
6.
With the label still selected, click Reverse Label on the ribbon. The
bearing now reflects a SW orientation.
▶
7.
Press Esc to clear your current selection. Then repeat steps 2 through 4
for the label on the west side of lot 62 using a label style of Distance.
The label should
now show only the
distance, and it should
be located on the east
side of the line.
8.
Use the Add Labels command to add a new distance label to the west
side of lot 68. Don't forget to flip the label so that it's shown on the
inside of the lot.
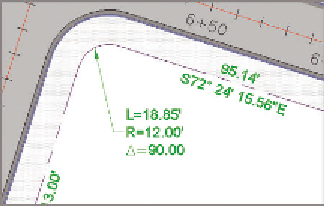
9.
Click the curve label at the northwest corner of lot 68. Click the square
grip, and drag it to the south and east. Place it in the open space
between the lot 68 area label and the northwest corner of the lot.
The label is reoriented, and a leader appears that points back to the
curve (see Figure 13.5).
FiGuRE 13.5
A curve label that has been dragged
away from the curve to reveal its dragged state
10.
Continue moving, flipping, and reversing labels to improve the read-
ability of the drawing and remove redundant bearings. Assign new
styles where applicable.
11.
Save and close the drawing.
You can view the results of successfully completing this exercise by opening
Editing Labels Graphically - Complete.dwg
.
Creating Parcel tables
As you can guess, property drawings can become cluttered with many labels
for areas, bearings, distances, and curve dimensions. As the drawing becomes
more complex, it might make sense to put all that information in a table instead