Graphics Programs Reference
In-Depth Information
▶
11.
In the Create Parcels - From Objects dialog box, change Parcel Style
to Property and click OK.
Two new parcels are
created, as shown by
the areas where the
hatching has been
carved away.
12.
In Prospector, right-click Parcels and select Refresh. Preview the parcels
in the item view window as you did earlier with the Basic : 1 parcel.
13.
Click one of the dashed right-of-way lines, right-click, and then pick
Select Similar.
14.
Again, on the Home tab of the ribbon, click Parcel
➢
Create Parcel
From Objects. Click OK to dismiss the Create Parcel - From Objects
dialog box with the default settings.
15.
Refresh, and preview the parcels in Prospector again. Now there are
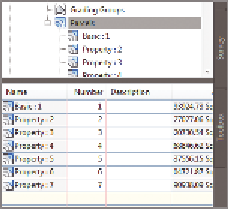
seven parcels in all (see Figure 12.5).
FiGuRE 12.5
Seven
parcels are now listed in the
Prospector item view.
16.
Save and close the drawing.
You can view the results of successfully completing this exercise by opening
Creating Parcels from Objects - Complete.dwg
.
Creating Parcels by layout
Earlier in this chapter, you read about the advantage of using basic AutoCAD
drafting commands to produce parcel geometry. As mentioned, these commands
are great for drawing lines and curves based on general geometric principles. But
what if you need to create parcels that occupy a certain area, parcel segments
that are perpendicular to a road frontage, or parcels that meet a minimum depth
requirement based on zoning laws? These are all criteria that are specific to
property boundaries, and they are all built into the Civil 3D
Parcel Layout Tools
Certification
Objective