Graphics Programs Reference
In-Depth Information
If you haven't already
done so, download
and install the files for
Chapter 11 according to
the instructions in the
Introduction.
sections; and just as with styles, codes are the key to automating the placement
of labels.
Exercise 11.4: Apply labels with Code Set Styles
In this exercise, you'll use a code set style to add labels to a corridor section.
You'll then modify the code set style to add a label at the crown.
◀
◀
1.
Open the drawing named
Labeling with Code Set Styles.dwg
located in the
Chapter 11
class data folder.
Once again, the draw-
ing is zoomed in to the
design section views
from the previous
exercises.
2.
Click the corridor section in the bottom section view, and then select
Section Properties on the ribbon.
3.
Change Object Style to Design With Labels, and click OK. Press Esc
to clear the selection.
The corridor section now includes labels for slopes, elevations, and
shape codes. Next, you'll modify the code set style to add an elevation
label at the crown of the road.
4.
Open the Tool Palettes window by clicking the Tool Palettes icon on
the Home tab of the ribbon. Click the Basic tab in the Tool Palettes
window to make the Basic palette come to the forefront.
You're taken directly
to the Help window for
this subassembly.
◀
5.
Right-click BasicLaneTransition, and select Help.
6.
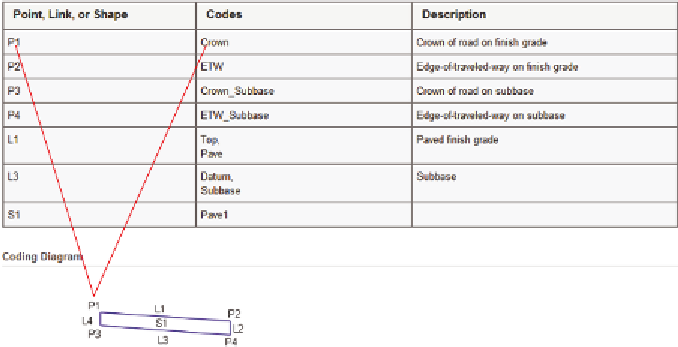
Scroll to the bottom of the Help page, and study the coding diagram.
◀
Note that point P1
is coded Crown (see
Figure 11.4). This is the
code you'll use.
Normally, editing a
style would be consid-
ered outside the scope
of this topic; however,
this simple exercise
will help you under-
stand the link between
the code and the label.
FiGuRE 11.4
Coding diagram for the BasicLaneTransition subassembly
◀
7.
Close the Help window. Click the corridor section, and then click
Section Properties
➢
Edit Code Set Style on the ribbon.