Graphics Programs Reference
In-Depth Information
2.
Click the Jordan Court alignment, and then click Geometry Editor on
the ribbon.
This opens the Alignment Layout Tools toolbar.
3.
On the Alignment Layout Tools toolbar, click Insert PI. Then snap to
the center of the circle marked A.
4.
Click Delete Sub-entity, and then click the curve at the PI marked B.
5.
Click the tangent between A and B to remove it as well. The align-
ment should now look like Figure 5.11.
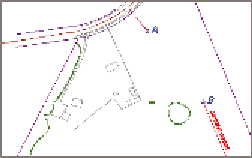
FiGuRE 5.11
Alignment after
removing a tangent and a curve
6.
Expand the curve button, and click More Floating Curves
➢
Floating
Curve (From Entity End, Radius, Length).
7.
Click the tangent near point A.
8.
Type
O
and press Enter to indicate a counterclockwise direction.
9.
Type
100
(
30
) and press Enter to provide the radius.
10.
Type
100
(
30
) and press Enter to provide the curve length.
A short curve is placed at the end of the tangent.
11.
On the Alignment Layout Tools toolbar, expand the curves button,
and select Free Curve Fillet (Between Two Entities, Radius).
12.
Click the curve you just created in the previous steps.
13.
Click the red tangent that begins at point B.
14.
Press Enter to indicate that the solution is less than 180 degrees.
15.
Type
R
and then press Enter to indicate that it's a reverse curve.
16.
Type
100
(
30
) and press Enter to provide the radius. Press Enter to
end the command.
The new curve is created in the drawing, as shown in Figure 5.12.