Hardware Reference
In-Depth Information
<input type='hidden' name='L' value='5' />
<input type='submit' value='Toggle Blue' />
</form>
<form action='' method='get'>
<input type='range' name='S' min='0' max='1000' step='100' value='0'/>
<input type='submit' value='Set Frequency' />
</form>
This HTML page includes four form elements.
<form>
specifies the
beginning of a form, and
</form>
specifies the end. Within each form are
<input />
tags that specify what data will be passed to the server when the
form is submitted. In the case of the LED toggle buttons, a variable called
L
will
be passed to the server via a GET method with a value equivalent to the I/O pin
number that you will be toggling. The empty
action
element in the
form
tag
indicates that the same page should be reloaded when the variable is passed to
the server. The
hidden input
specifies that value will just be passed when the
Submit button is pressed. For the frequency slider, we are using a new HTML5
input
element called
range
. This will make a range slider. You can move the
slider (in increments of 100) to select a frequency that will be transmitted as
the value of a variable called
S
. In older browsers, this slider might render as
an input box rather than a slider, if they don't yet support the
range
element.
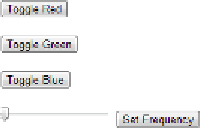
To see what the page will look like, open it up with your favorite browser (I
recommend Google Chrome). In Chrome, you need to press Ctrl+O (Windows)
or Cmd+O (OSX) to get an Open dialog box. Open the HTML file you just made
in your browser (see Figure 14-3).
Figure 14-3:
Web page content test in Chrome.
If you press any of the buttons, you should see a variable GET statement
appended to the address in your browser's URL bar.
WritinganArduinoServerSketch
Now, you need to take the HTML you've developed, and integrate it into a larger
Server sketch that will handle connecting to the network, responding to client
requests with the page you designed, and responding to GET statements from
the page forms.
Search WWH ::

Custom Search