Graphics Programs Reference
In-Depth Information
You have only one physical feature left to add to the part. It's a common feature,
and without the right tool it can be diffi cult to add to a part like your fan blade.
The Rib and Web Tools
For plastic or cast-metal parts, reinforcement ribs are a common need. Drawing
ribs individually can be very time-consuming, and creating the parametric rela-
tionships to maintain consistency across all the ribs can add a great deal of
complexity to the part. Webs are similar to ribs. Unlike ribs, which typically ter-
minate on a face and have their geometry blend into the part, webs begin on a
plane but stop at a distance from that plane.
The process of creating both features is quite direct. Select the sketch ele-
ments you want to use, and then click the Direction button. Drag your mouse
on the screen to determine the direction in which the ribs (or web) will be built.
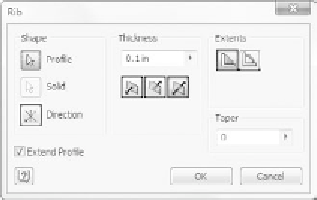
The dialog box also presents a few options:
Extents
This is where you select whether to create a rib or a web. If you select
Web, a fi eld appears below the Extents buttons so you can enter the depth of the
web from the sketch plane.
Thickness
This option controls the width of the web or rib as it goes to its ter-
mination. Buttons below the value control whether the width is offset to one
side or the other or split in the middle of the sketch element.
Extend Profi le
When this is checked, a sketch element that isn't closed contin-
ues in its path until it fi nds a boundary on the existing geometry. If this isn't
selected, the rib stops at the end of the sketch element.
Taper
This option adds a draft angle as the rib is created. Unlike when adding
taper to an extrusion, you need not worry about a positive or negative angle.
Direction
If the preview of the rib or web isn't going in the proper direction,
you can select this icon and, by moving your cursor in the Design window,
reorient the direction of the preview.


Search WWH ::

Custom Search