Graphics Programs Reference
In-Depth Information
The tool is very simple and provides only two ways to defi ne the feature. These
two features allow for all the fl exibility you'll usually need:
Fixed Edge
If you need to apply a draft as it runs along an edge, you use the
Fixed Edge option. This edge doesn't have to be a simple, straight edge. It can
be a curve or a complex combination of geometry. You can also select a face for
your plane, but the behavior is different than the Fixed Plane method. After
you've selected your edges, you select the faces to draft and then set the direc-
tion of pull that will control whether the applied draft angle faces in or out.
Finally, you set the Draft Angle required in the text box at right.
Fixed Plane
This option pivots the selected face about a plane. The farther the
selected face is from the plane, the more dramatic the effect is. The other options
required are the same as for the Fixed Edge method, but the results can be very
different.
Adding Draft to the part
Now you'll add draft to the free faces on the part:
1.
Start the Draft tool from the Modify panel on the Model tab.
2.
Select the XY plane of the part for the Pull Direction. The Direction
indicator should be pointing in the Z direction.
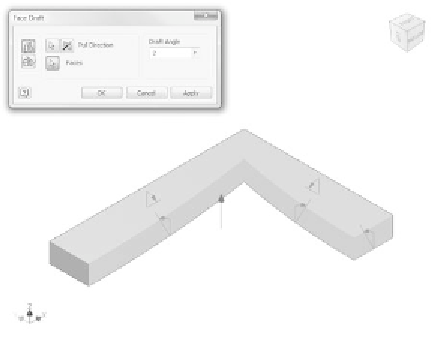
3.
Select the faces shown in Figure 6.12. The preview should show the
faces tipping into the part.
FIGURE 6.12
Adding draft to the part's faces


Search WWH ::

Custom Search