Graphics Programs Reference
In-Depth Information
11.
Rename the feature
Center Axis
.
12.
Save your work.
13.
Start the Hole feature.
14.
Set the Placement Method to Linear.
15.
Pick the large face closest to you.
16.
To satisfy the references, select the top and left edge of that face, as
shown in Figure 4.10. Set the dimension to the edges at
0.3
.
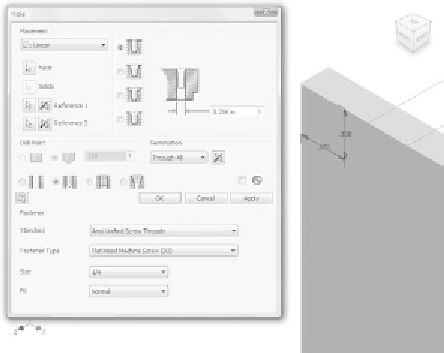
17.
Set the hole Termination to Through All and the size to be a clear-
ance hole for a ¼˝ fastener, as shown in Figure 4.11.
FIGURE 4.11
Locating a hole feature
18.
After you've made the selections, click OK to place the hole.
19.
In the Pattern panel, select the Rectangular Pattern tool.
20.
Select the Hole 1 feature, and then pick the edges you used to locate
the hole to set the direction.
21.
Make sure the number of instances is set to
2
for both directions, and
set the spacing to
5
. You may need to reverse one or more directions
for the pattern to match Figure 4.12.
22.
Click OK to create the pattern of holes.


Search WWH ::

Custom Search